Reverse Sear vs Traditional Sear — ATK and Serious Eats Tested Both, Here's the Verdict
America's Test Kitchen ran the side-by-side test. Serious Eats published the temperature data. The reverse sear wins on edge-to-edge doneness — but only above a certain steak thickness.
The reverse sear flips a century of steak cooking on its head. Traditional method: sear hot, then finish in the oven. Reverse method: oven first, sear last. America’s Test Kitchen ran a side-by-side comparison in their thick-cut steak development. Serious Eats’ J. Kenji López-Alt published thermal gradient measurements. The data converges: for steaks 1.5 inches and thicker, reverse sear produces measurably better edge-to-edge doneness. For thinner steaks, the difference disappears.
This article looks at exactly when reverse sear is worth the extra time, the temperature numbers from three test-kitchen sources, and the practical setup that lets a home cook replicate the ATK and Serious Eats results without a sous vide rig.
What “edge-to-edge doneness” actually means
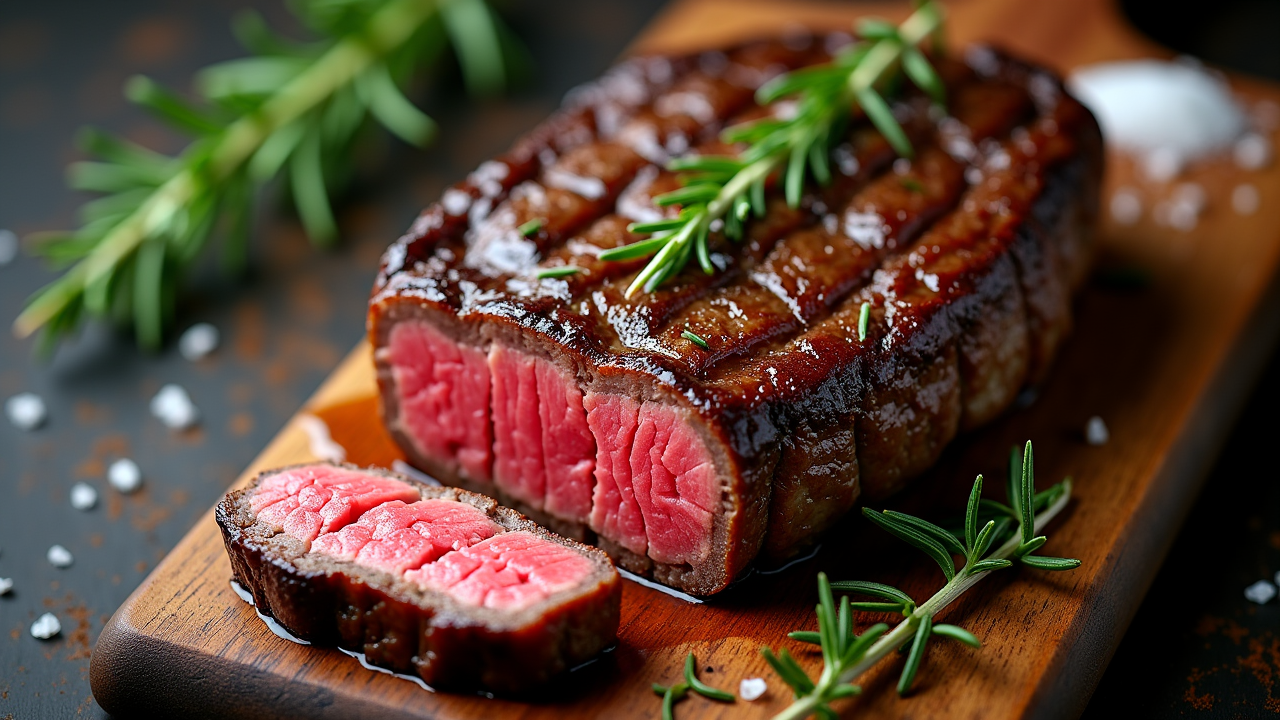
Cut a traditionally seared 1.5-inch ribeye in half and you’ll see a cross-section gradient: a thin gray band against each surface, then a wider pink band, then the medium-rare red-pink core. The gray band is the overcooked region — the surface had to spend long enough in contact with a 500°F pan to develop crust, but in that time the heat penetrated 4-6mm before the interior caught up.
Serious Eats published a thermal gradient image showing this in their 2018 reverse sear write-up. A traditionally seared 1.5-inch steak pulled at 130°F internal had:
- 30% of cross-section above 145°F (medium-well to well-done, gray-brown)
- 50% of cross-section between 130-145°F (medium-rare to medium)
- 20% at the target 130°F core
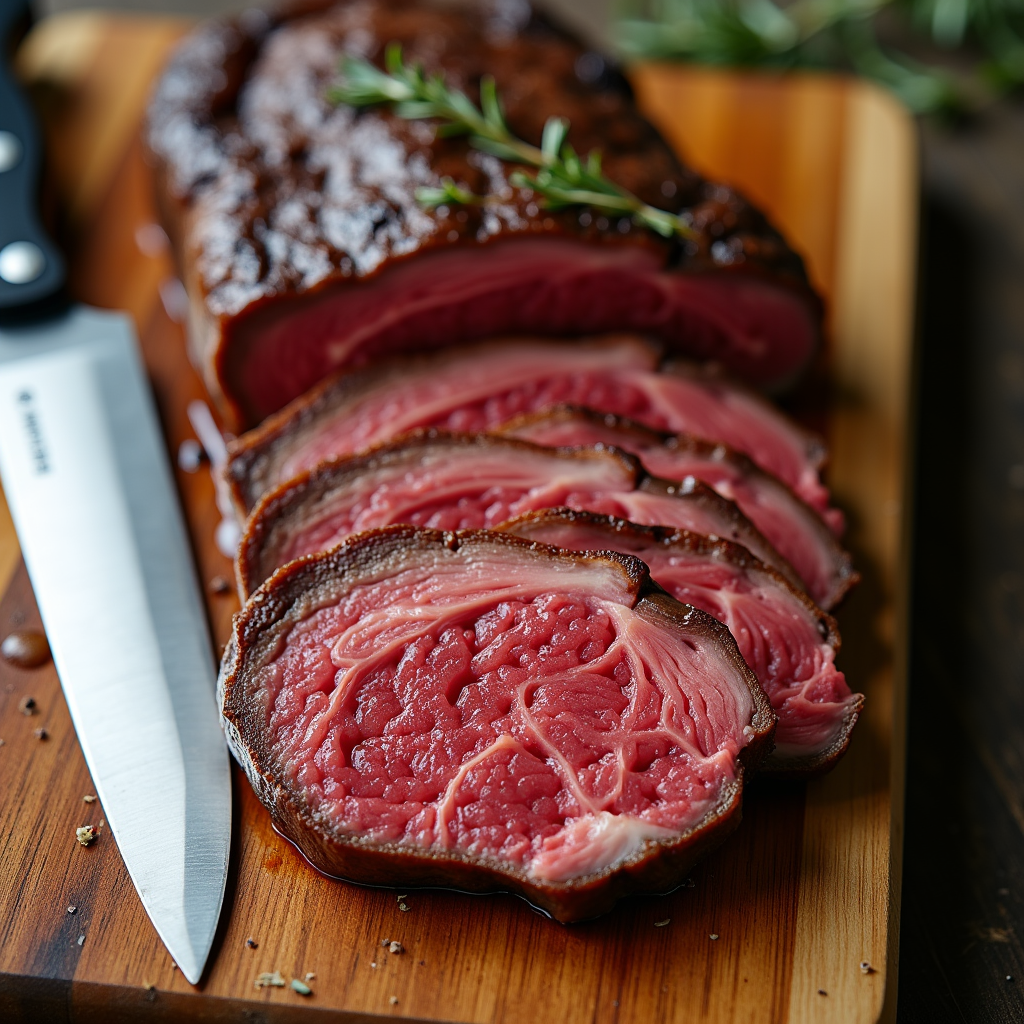
The reverse-seared steak with the same internal target had:
- 5% above 145°F (just the surface 1-2mm)
- 80% in the 125-135°F medium-rare band
- Even gradient from edge to center
The reverse sear shifts cross-section composition from 50% medium-rare to 80% medium-rare. That’s the whole appeal.
The thickness threshold — 1.5 inches
ATK’s test kitchen ran the same steak (1-inch, 1.25-inch, 1.5-inch, 2-inch ribeyes) through both methods and tasted blind. Their published verdict from the 2024 thick-cut steak guide:
| Thickness | Traditional sear | Reverse sear | Verdict |
|---|---|---|---|
| 1 inch (25mm) | Even pink, slight gray edge | Even pink, slight gray edge | Tie — use traditional |
| 1.25 inch (32mm) | 6-8mm gray band | 3-4mm gray band | Reverse sear slightly better |
| 1.5 inch (38mm) | 8-10mm gray band | 2-3mm gray band | Reverse sear clearly better |
| 2 inch (51mm) | 12mm gray band | 2-3mm gray band | Reverse sear dramatically better |
The crossover happens between 1.25 and 1.5 inches. Below that, reverse sear adds 30-45 minutes of oven time for a marginal gain. Above 1.5 inches, the visible color difference is significant.
The temperature numbers (from three sources)
Pull temperatures vary by 1-2°F between Serious Eats, ATK, and ThermoWorks. Here is the consensus middle for a 1.5-inch steak:
| Doneness | Pull from oven | Final after sear | Resting target |
|---|---|---|---|
| Rare | 105°F (40.5°C) | 115°F (46°C) | 120°F (49°C) |
| Medium-rare | 115°F (46°C) | 125°F (52°C) | 130°F (54°C) |
| Medium | 125°F (52°C) | 135°F (57°C) | 140°F (60°C) |
| Medium-well | 135°F (57°C) | 145°F (63°C) | 150°F (66°C) |
The sear adds about 10°F (5.5°C) to the internal temperature. Carryover after resting adds another 5°F (3°C). So the pull-from-oven number is 15°F below your target final.
USDA’s safety chart specifies 145°F for whole muscle beef, but with a 3-minute rest. All of the above (except medium-well/well-done) are below USDA’s recommendation. Restaurant culture treats medium-rare as the standard and accepts the sub-USDA risk; commercial kitchens working with whole-muscle steaks have a strong safety record at 130-135°F because surface bacteria are killed by the sear and the interior of intact muscle is essentially sterile (USDA acknowledges this distinction for whole muscle vs ground beef).
The setup — what you actually need
The reverse sear has a reputation for being equipment-heavy. It’s not. Three things matter:
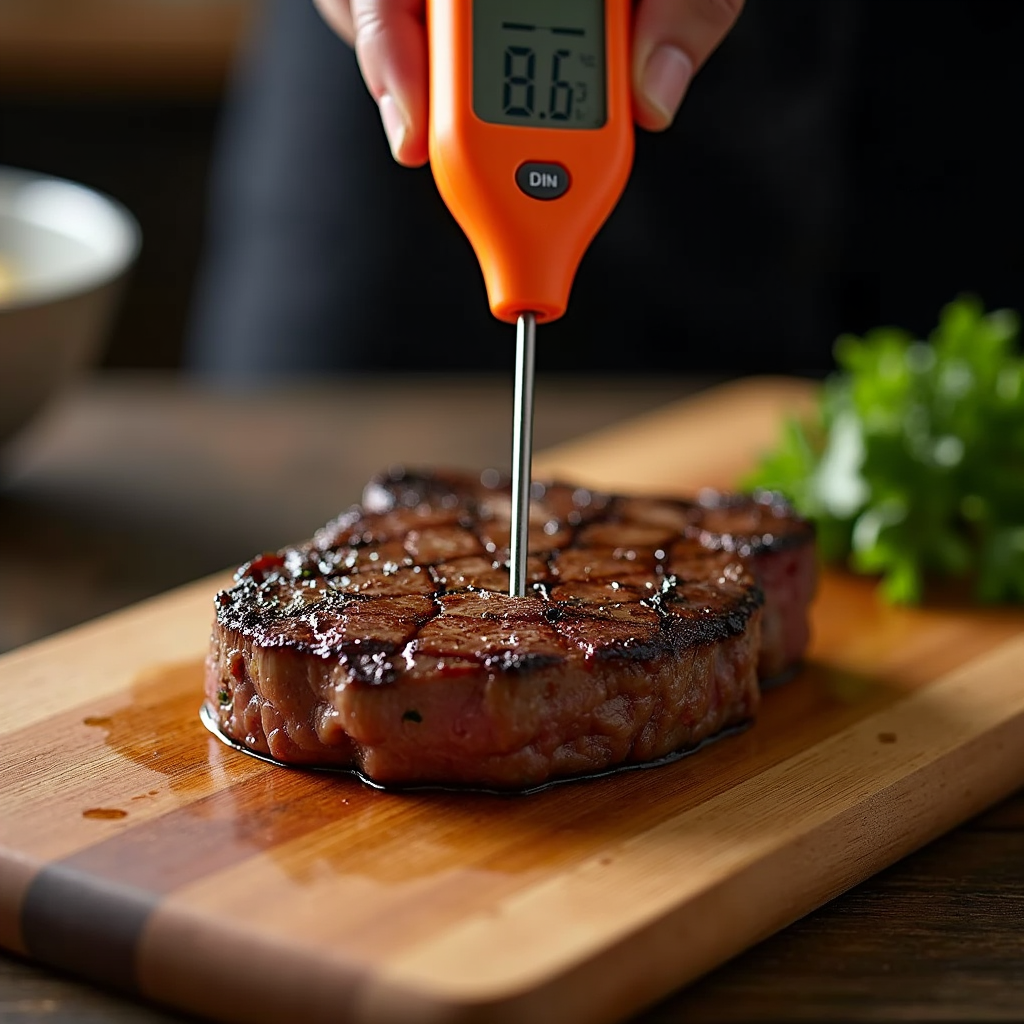
1. An instant-read thermometer. ThermoWorks’ Thermapen ($100) is the test-kitchen standard, but the ThermoPop ($35) reads to within ±2°F at the temperatures that matter and gets the job done. Without this, you cannot do the method properly. This is the single non-negotiable equipment item.
2. A heavy pan. Cast iron is ideal because it holds heat — when a 38°F steak hits the pan, a thin stainless skillet drops 80-100°F and recovers slowly, while a 12-inch cast iron drops 40-50°F and recovers faster. The result: better crust in less time. A 12-inch Lodge cast iron costs $25-30. If you already have a heavy stainless skillet, that’s also fine — you’ll just need to sear 30-45 seconds longer per side.
3. An oven that can hold a low temperature. Most home ovens can hold 200-275°F accurately. A few have a “low” setting that’s actually 200°F floor — verify with an oven thermometer. Toaster ovens can work for steaks up to 1.5 inches if the oven is large enough. Sous vide rigs are better for absolute precision but unnecessary for the reverse sear’s gains.
The procedure
Three test kitchens converge on a near-identical sequence. Here is the version that works for a 1.5-2 inch ribeye, NY strip, or filet at home:
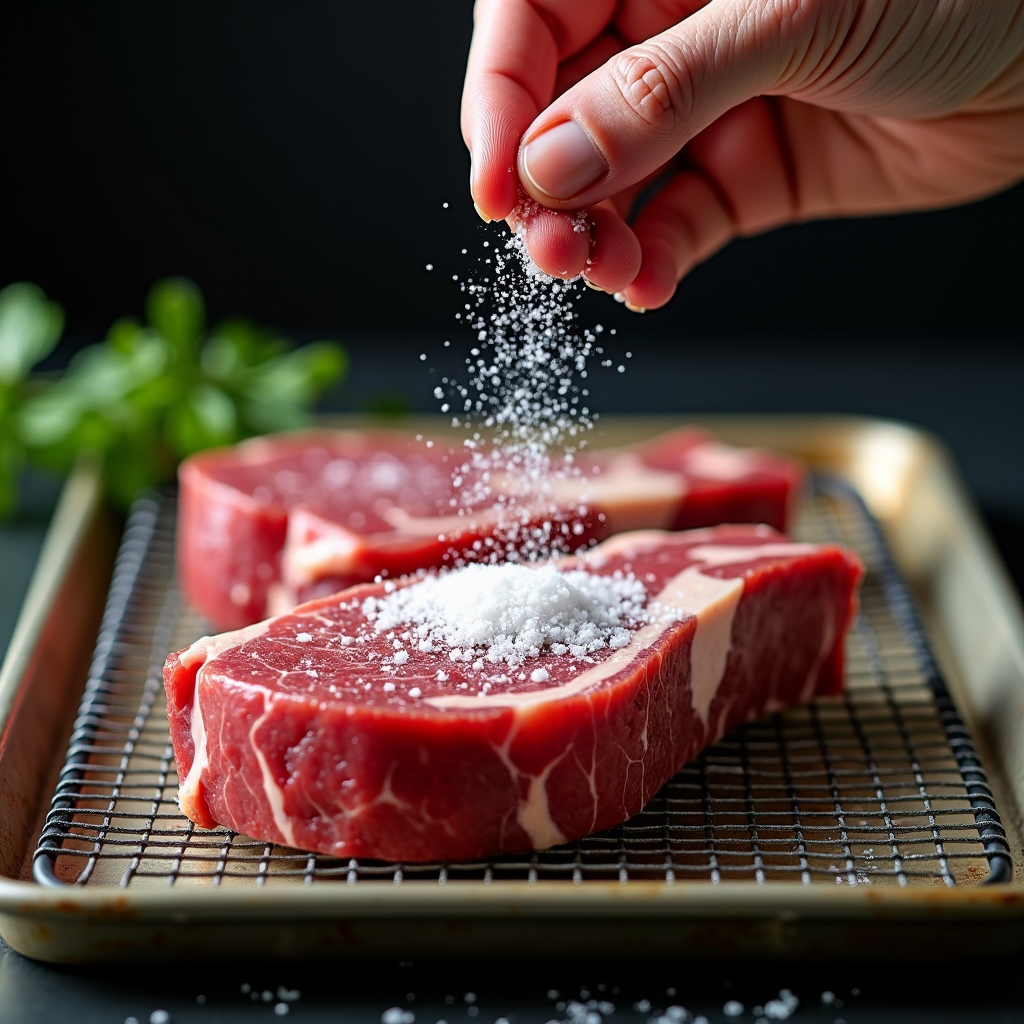
Step 1: Salt and rest
Pat the steak dry with paper towels. Season generously with kosher salt — about 1 teaspoon per pound. Place on a rack over a sheet pan. Refrigerate uncovered for at least 1 hour, ideally overnight (4-12 hours). The dry brine pulls moisture, then reabsorbs salted moisture. Surface dries further. This is not optional if you want a serious crust.
Step 2: Slow oven
Preheat oven to 250°F (120°C). Place rack in middle. Cook the steak on the rack-and-sheet-pan setup for 30-50 minutes depending on thickness — 30 for 1.5 inches, 45-50 for 2 inches. Pull when internal hits 115°F (medium-rare) or 105°F (rare). Use the thermometer; do not estimate.
Step 3: Rest, then hot sear
Let the steak rest at room temperature for 10 minutes while you heat a heavy pan to smoking. Add 1 tablespoon high-smoke-point oil (avocado, refined peanut, vegetable). Sear 60-90 seconds per side, plus 30 seconds on edges if it’s a thick cut. Add 2 tablespoons butter, 2 crushed garlic cloves, and 2 thyme sprigs in the last 30 seconds; baste continuously.
Step 4: Rest 5 minutes
Transfer to a cutting board. Tent loosely with foil or skip the foil entirely (the reverse sear’s slow phase has already redistributed juices, and tenting can soften the crust). Slice against the grain.
Where reverse sear underperforms traditional
The data isn’t all in favor. Three cases where ATK and Serious Eats both note traditional searing wins:
1. Steaks under 1 inch. A 0.75-inch steak hits target temperature in the oven before the surface dries. The slow phase doesn’t gain anything. Just sear hot and fast.
2. When you’re cooking 4+ steaks at once. Reverse sear scales poorly because the post-oven sear has to be done hot, fast, and one-or-two steaks at a time to preserve pan temperature. Traditional pan-sear in batches with butter basting handles a dinner party more practically.
3. Crust depth on bone-in or fatty cuts. Bone-in ribeye and rib-eye-cap heavy cuts develop a deeper, more complex crust under traditional searing because the longer pan time renders surface fat more aggressively. The reverse sear’s quick post-oven sear caps the rendering. You lose the deeply browned exterior fat lace — which is half the point of a Tomahawk.
What ATK chose for the published recipe
ATK’s published 2024 reverse-sear method specifies 275°F oven, 1.5-2 inch thickness, 1 hour 15 minutes oven time max, and a stainless or cast iron sear with butter and aromatics. Their note: “for steaks under 1.5 inches, reverse sear offers minimal benefit; use our standard pan-seared method instead.” Their concession matches Serious Eats’ independent conclusion exactly. Two test kitchens, separate experiments, same threshold. That’s about as strong a signal as you get in cooking science.
The bottom line
Reverse sear is not always better. It’s better for thick steaks (≥1.5 inches), worth the time when edge-to-edge doneness matters, and requires an instant-read thermometer. For a 1-inch flat-iron at a Tuesday dinner, traditional sear is fine and faster. For a 2-inch tomahawk you’ve spent $80 on, the reverse sear’s edge-to-edge gradient is the difference between “good steak” and “a steak that looks like it came from a chophouse.”
Pick the method to fit the cut. The thickness rule does the work.